Spring 2025 marks my 4th year painting live at weddings and in that time I have gone through so many easels. I started with a French style easel I found on amazon. This felt more authentic for a live wedding painting and I wanted the plein air feel. And it was cute but I found that guest bumped into it a lot and it took up too much room. It wasn't as sturdy as I would have liked so I boxed it up after that first wedding and eventually sold it on marketplace. The next several weddings I took my easel from home; a nice sturdy H frame. I like that this style folded easily and had a shelf on the bottom so that I can rest my feet. I tried to make that floppy hat a thing for about one summer and then gave up on it. The H frame easel was great and it is still my easel I use in the studio but the constant moving and folding took a toll on the wood and now it's hard to get the bolts to tighten enough for everything to stay in place. I added more washers but it really wasn't meant for the constant travel. I've also noticed that I have really added to my paintbrush collection. Additional must have for me was the IPad holder, that folding table and the Staywet pallet. About a year ago I feel in love with a single staff easel I found through facebook advertising. VISWIN Extra-Large Studio Easel, Hold Canvas to 71", Tilts Flat $230 for the darker wood. I did a lot of research and back and forth because it was a little on the pricey side but I really thought it beautiful! And it is! But like the other easels it has some draw backs.... it's huge! and awkward to load. I have to drive my expedition in order to transport it to venues and still lay a seat down. The main staff has to rise for you to raise the height of the canvas which can make the overall height of the easel crazy tall. That's a weird design fail that should have been an easy fix. But it looks great and they did put some decent casters on it so once it's out of the car its fairly easy to move across most surfaces. After a year of moving this monster around I went back to looking at easels and have made what I hope to be my final purchase for a while. The Jack Richeson Sienna Plein Air Canvas HolderI believe I first saw the tripod set up on a Facebook group dedicated to wedding painters and I was intrigued which led to a deep dive and many blogs, Youtube, and Tiktoks later I was convinced I need one. It is very pricey and I hesitated for months before making the purchase. My hope was to find a good used one on Ebay but my problem was I did not want the poache box which is what is more commonly sold. I needed only the canvas holder and a tripod. The Sienna tripod is over $300 alone! So once again lots of research went into this purchase. I eventually went with a nice camera tripod for a little less money Vanguard VEO3+263AB Aluminum Tripod with Ball Head with Multi-Angle Center Column for Overhead Shots it cost about $189 but that's because I went with an older model and it is an excellent tripod. I also ordered a 2nd cheaper tripod with the intentions of sending back the one I didn't like. It was about $79 and I do like that I can fold the legs up so that the overall carrying and loading of this tripod is easier but it is definitely not as nice as the vanguard. VICTIV 80" Camera Tripod, Aluminum Heavy Duty Tripod Stand with 360° Ball Head, Camera Tripods & Monopods with Carry Bag, Professional DSLR Tripod for Canon Nikon Binoculars Spotting Scope Telescope I use this tripod to set up my camera for filming and at home I use it in the studio for my projector.
I opted for the Sienna Plein Air Palette Box (CT-PS-100) ($135) along with the canvas holder ($107)... because I went with a different brand tripod I had to order a different release plate so I could make the attachment from the canvas holder to the tripod. Vanguard QS-60 V2 Quick Shoe Release Plate for Alta Pro 2/2+ and Arca Compatible Tripod Heads So the good... I can now load up almost everything I need in my husband's Honda Accord if I needed to go to a venue and couldn't take my Expedition. It's a ton easier to load and unload and I take up a little less space. My set up still looks nice and professional and I'm better equipped for outdoor venues with uneven ground. The bad.. it was very expensive. and the canvas holder swivels on the tripod but I do think that is something I can fix if I tried. It will only hold up to 30" and I couldn't use it with a frame which is something I'm seeing a lot right now. I probably didn't need the Palette box and it fits weirldly on my tripod but I like the way it looks lol. I regret nothing lol I love my new tripod easel! I also love that I have the beautiful single staff to use when I want to show off at wedding expos or big events. I added a couple more things like the rock holder thing to weigh down the tripod and a folding chair that is really too short for my uses. I now have a nice leather bag to carry it all in and a new chair from my sister in law for Christmas. I plan on breaking down my whole set up in a future blog post and will post more about those later.
0 Comments
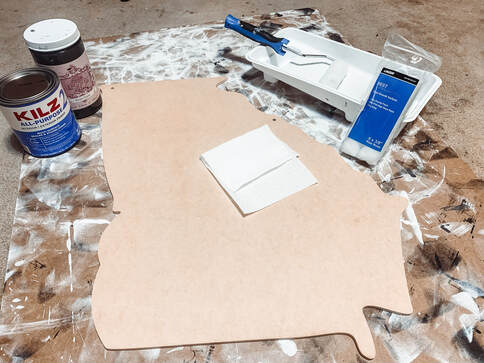
This is truly a tell all expose.I've said it before but south Georgia heat and humidity is a beast, sometime even way into the winter. I treat all my outside projects like they will be used in the middle of July. After much experimentation I have come up with a method that's effective and fairly fast. Please note I do these in batches. This particular session I had 5 Georgia shapes, 2 mason jars and 2 back of trucks, all of which were at least 24" at their longest length. 
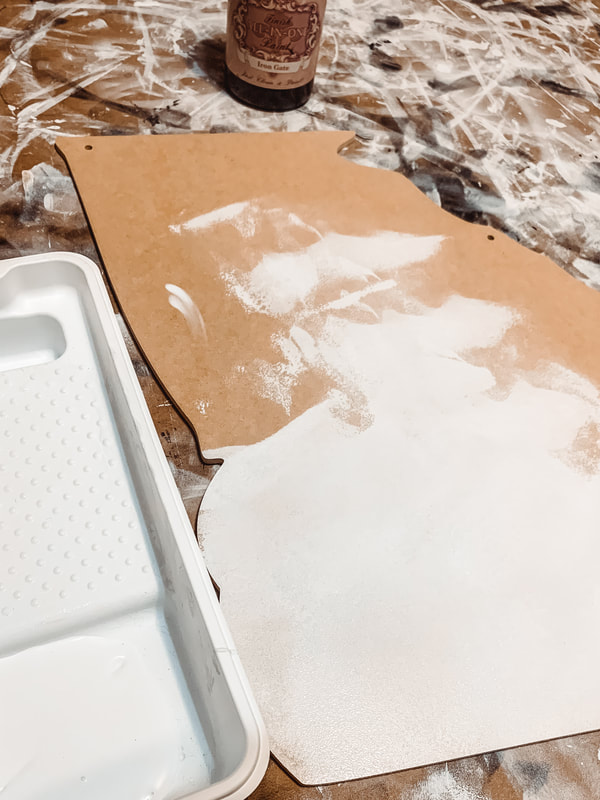
Step 1. Clean the boards. I only use a dry paper towel to dust each piece especially edges and crannies. If I was outside I would use compressed air but I'm working out of a spare room in the back. Dry clean I would not spray or use any damp method MDF will quickly absorb any liquids.
Step 2. Roll on primer. I'm using Kilz All Purpose here but any latex primer will work. I bought both the primer and the mini rollers on the same aisle at Walmart. Here in the sticks where I live our Walmart is circumcised compared to all the wonderful Super Walmart's out there so if we have it its safe to say all Walmart have them. ![]() 
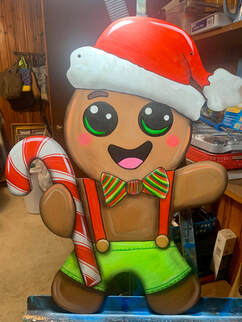
Common newbie questions: "what do I do now", "do I seal it?", "how?", "how do I hang it" etc etc etc... I'll try to break down my process and hopefully answer these plus a few extra tips. FYI my knowledge is from a combination of experience in painting on a range of material and working in custom framing while in college. Here's my Snazzy Gingerbread waiting to go hang out on someone's door. I started this process by checking to see if I needed to fix anything. I like to wait a day or two from finishing the actual painting and then come back with fresh eyes. Which is when I noticed his eyes needed to be touched up. I had used a marker to out line and it didn't blend in well with the paint so I used my darkest black and repainted the eyes and mouth. Tip #1 Not all paint colors are created equal.... They vary due to brand, type, name etc... Mars Black and Ivory black are the two most common names I've seen but recently I've found a permanent Black in Master's touch acrylic line (Hobby Lobby's house brand) that is way dark. New favorite. I also touched up the edges were the primer was showing. I'll show later in another blog post how I start the door hangers. They come to me as plain MDF cutouts. I coat the backs and edges first with a special black paint and then roll on a primer on the fronts. My goal is to seal the MDF as well as possible since its so vulnerable to moisture. I only touch up the edges were the front is dark so I did not go around the hat. Why not the whole thing? Because I'm prone to booboos and the red and white hat is not as forgiving as the rest of the gingerbread man. Maybe it was art school... Maybe growing up in south Georgia![]() 
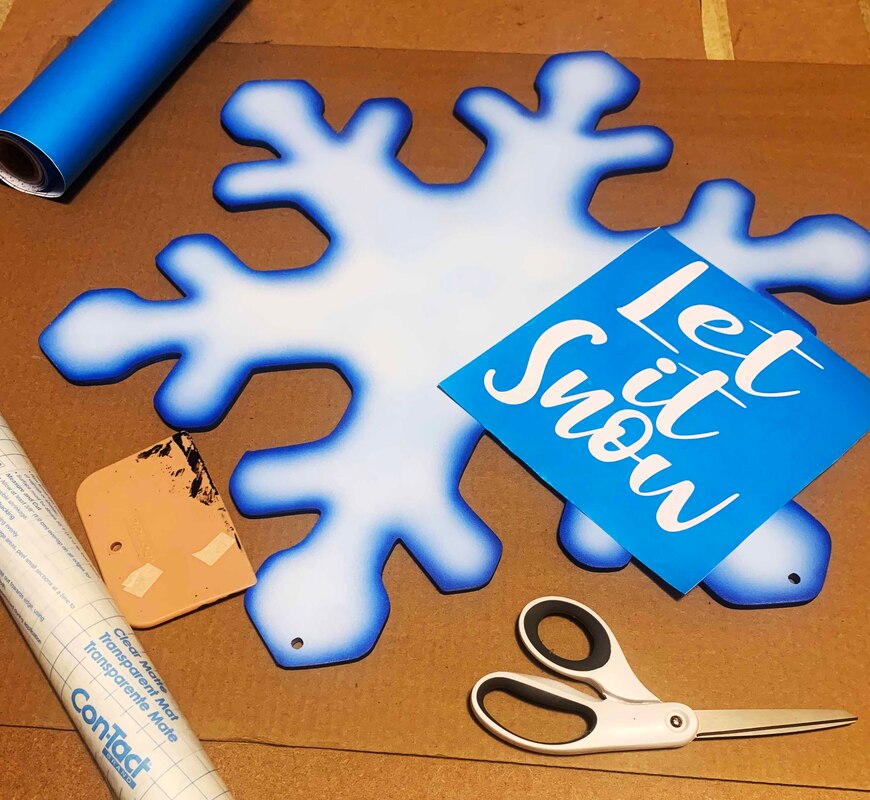
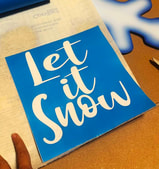
The first time I did a stencil on a door hanger it was awful. It was a gorgeous mason jar hanger. It WAS painted and airbrushed to perfection. I was in love. I had left over cheap vinyl and used my cameo to cut the stencil. When I started to peel the vinyl off not only did I have bleeds... it lifted in little spots allllll over. So I tried to order some Oracal Stencil Vinyl but there was several different types. I wanted a low tack stencil I could use on door hangers but since I airbrush I wanted it to be flexible enough I could use it on non flat surfaces. Sometime Stencil material is stiff or plastic like which would not have as many uses for me personally. I ended up with an off brand Masking Film from amazon that has been fairly reliable. It was a blind buy but I was lucky this time. I made up a design using the Silhouette Studio and cut with my older Cameo 2. Easy so far. Next I cut out some contact paper the size of my stencil. |
Karla NobleAlmost 20 years of art success and struggles now in writing for your reading pleasure. Archives
January 2025
Categories |